Operation toolbar
Corner - The tool can be used to apply corner to two edges or by selecting a point where they intersect. You get multiple options to choose from the Sketch tools toolbar so as to define what to do with the elements that are being modified. You can choose to turn them to construction elements, trim them etc. The toolbar can also be used to enter the radius value that you wish to apply.
Chamfer - The option can be used to apply chamfer to two edges or a point where these edges intersect. Options similar to above are available for the chamfer tool too. In addition, you have the option of specifying either the chamfer length with angle value of the chamfer from horizontal. You can also specify two lengths of the lines on which the chamfer will be made or length of first element from the point with angle value.
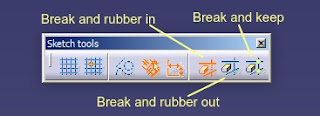
There are three options available in the sketch tools toolbar for
quick trim, Break and rubber in, Break and rubber out and Break and
keep.
Close arc - Close arc can be used to close the arc to form a circle.
Complement - To create an inverse of an arc i.e. its complement, this tool can be used to create that.
Symmetry - If you use the symmetry option, a copy will be created about the line that you select. However, the original element will be deleted. And since the original element will be deleted, there would be no constraints applied to the original element.
Translate - Translate option can be used if you wish to make a copy or some elements at some distance or want to simply move elements from original location to some distance in some direction. You also get an option to keep the internal and external constraints.
 |
| Chamfer options present in sketch tools toolbar |
Relimitations toolbar
The toolbar has options that can be used for erasing or extending
lines. It also has tools that can be used for completing circles,
ellipse etc. or create their complement.
 |
| Relimitations toolbar |
Trim - The
trim tool can be used for trimming as well as extending the elements
with respect to each other. There are two options available for this in
the sketch tools toolbar - Trim all elements or trim first element.
Trim all elements can apply modification of extension and trimming to
both elements while trim first element would apply it to only the first
element you select, the second element will not be modified.
Break - Break can be used to split element into two parts. You can either split the element with a click first for selection and other for where you wish to break the element. Alternatively, you can split the element with the help of another element. When you use another element, the point at which the element intersects the other, is used as breaking point.
Quick trim - The quick trim option is most commonly used option for erasing the elements. Not only does it erase the selected element, it can also break depending upon the option you select from sketch tools toolbar.
 |
| Quick trim options in Sketch tools toolbar |
Close arc - Close arc can be used to close the arc to form a circle.
Complement - To create an inverse of an arc i.e. its complement, this tool can be used to create that.
Transformation toolbar
The existing elements in sketcher can also be transformed in respect
to their scale, location, rotation etc. For this the different tools in
the transformation toolbar.
Mirror - This
can be used to create a similar element about a line element, vertical
axis, horizontal axis. The copy created will maintain the same
distance as the existing original element due to automatic symmetry
constraint that is applied.
 |
| Transformations toolbar |
Symmetry - If you use the symmetry option, a copy will be created about the line that you select. However, the original element will be deleted. And since the original element will be deleted, there would be no constraints applied to the original element.
Translate - Translate option can be used if you wish to make a copy or some elements at some distance or want to simply move elements from original location to some distance in some direction. You also get an option to keep the internal and external constraints.
 |
| Translate options |
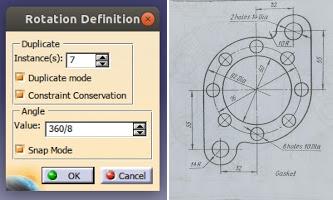
Rotate - Rotate
option is generally used to create multiple copies of an element about
a centre point. The multiple copies can be made while preserving the
constraints such as distance, radius etc.
A noteworthy case here is, suppose if you wish to create all circles
that are present around the centre as shown in the diagram. For this
you would need to create one circle first. All other circles along with
constraints can be duplicated with the help of rotate tool. The number
of duplicate entities that you would mention are 7, since one is
already present, while angle would be 360/8 i.e. total angle divided by
total number of elements. This is important because without correct
angle evenly spaced circles will not be created.
Scale - The tool can be used to create scaled elements about a point of reference. The point of reference is the point about which the elements will be scaled. It will be the point that would superimpose or would be same in the scaled and original object. It is essentially the point that you do not wish to move in the scaled object. If you simply wish to scale the original object without a copy, you can deselect the duplicate mode. To ensure that original constraints are applied to the duplicate object, you can choose to select the option of constraint conversion.
Offset - The offset tool can be used to create multiple copies of elements present in a sketch. The sketch tools toolbar present with the option of creating copies on both sides or only on one side. Besides mentioning the offset distance, you can mention the number of copies that are created.
The elements that you select may be in touch with other elements, so you
also have provision to propagate your selection based on point
continuity and tangent continuity.
 |
| 8 holes 10mm diameter, created with rotate option |
Scale - The tool can be used to create scaled elements about a point of reference. The point of reference is the point about which the elements will be scaled. It will be the point that would superimpose or would be same in the scaled and original object. It is essentially the point that you do not wish to move in the scaled object. If you simply wish to scale the original object without a copy, you can deselect the duplicate mode. To ensure that original constraints are applied to the duplicate object, you can choose to select the option of constraint conversion.
Offset - The offset tool can be used to create multiple copies of elements present in a sketch. The sketch tools toolbar present with the option of creating copies on both sides or only on one side. Besides mentioning the offset distance, you can mention the number of copies that are created.
 |
| Sketch tools options for offset |
